

Creating clean, clickable checklists in Word is one of the fastest ways to organize tasks, build forms, or design printable to‑do lists that people actually use. The good news is that once you learn how to insert a checkbox in Word using the Developer tab and symbol methods, you can build both interactive and print‑ready checklists in just a few clicks.
What You Can Do With Checkboxes in Word
Microsoft Word gives you two main checkbox options, and each serves a different purpose. Understanding them helps you choose the right method for your document.
- Interactive checkboxes in Word that users can click to tick or untick directly on screen (ideal for forms, surveys, or digital to‑do lists).
- Checkbox symbols that behave like regular text characters and are perfect for printable checklists or documents that will be filled out by hand.
Enable the Developer Tab First
To insert checkbox content controls (the interactive type), you must first show the Developer tab because it is hidden by default in Word. Once enabled, you unlock advanced features, including interactive checkboxes and content controls.
- Go to File, choose Options, and open the Word Options dialog.
- Select Customize Ribbon, then in the right‑hand list of main tabs, tick the Developer checkbox and click OK to add it to the ribbon.
Insert Checkbox in Word Using Developer Tab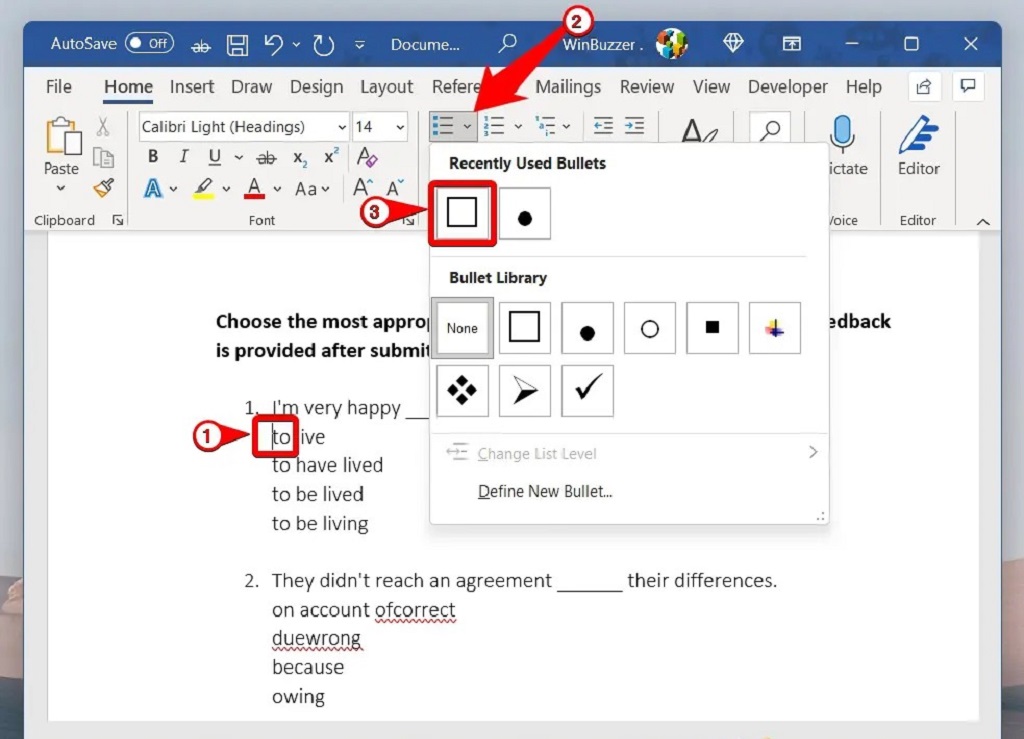
When the Developer tab is visible, you can insert interactive checkboxes in just a couple of clicks. This is the best method if your goal is to create fillable forms or interactive checklists in Word.
Step 1: Place Your Cursor
Click in the exact spot where you want the interactive checkbox to appear in your document. Many users place the cursor before a list item or inside a table cell for form‑style layouts.
Step 2: Add Checkbox Content Control
With the cursor in place, you can now insert the checkbox control from the Developer tab. This creates a clickable box that toggles on and off when selected.
- Go to the Developer tab on the ribbon and locate the Controls group.
- Click the Check Box Content Control button (the icon that looks like a box with a checkmark).
This action inserts an interactive checkbox content control that users can tick directly in Word, giving you fully interactive checklists in Word.
Step 3: Duplicate Checkboxes for a List
If you are building a longer checklist, you can quickly duplicate this interactive checkbox. This makes it simple to create multiple checkbox items without inserting each one from scratch.
- Type your first list item text next to the checkbox, then press Enter to go to a new line and insert another checkbox the same way.
- Alternatively, copy and paste an existing checkbox and its formatting to reuse it across your list.
Customize Interactive Checkboxes in Word
Once you add checkbox content control, you can change how it looks and behaves using its properties. This is especially useful when you want a different symbol or a cleaner, more professional form design.
Change the Checkbox Symbol
By default, Word may use an X as the checked symbol, but you can switch it to a checkmark or other symbol you prefer. This small change makes your interactive checkboxes in Word clearer and more visually appealing.
- Select an existing checkbox control, then click Properties in the Controls group on the Developer tab.
- In the Content Control Properties dialog, use the options at the bottom to change the checked symbol and unchecked symbol to the styles you want.
Adjust Appearance and Behavior
In the same properties dialog, you can fine‑tune how the checkbox content control interacts with the text and the user. These options help you build forms that are easier to use and less likely to be broken by accidental editing.
- Update the title or tag of the content control to make it easier to manage complex forms.
- Control whether users can delete the content control or edit its contents, which protects the layout of your checklist.
Insert a Checkbox Symbol for Printable Checklists
If you simply want a visual checkbox that will be printed and filled in by hand, the symbol method is fast and reliable. This type of checkbox is not clickable but works perfectly for paper forms, sign‑off sheets, and basic checklists.
Step 1: Open the Symbol Dialog
Word includes many fonts that contain checkbox and checkmark icons, and you can insert them just like any other symbol. Choosing the right font helps you get a clean, consistent checkbox symbol.
- Place the cursor where you want the checkbox symbol to appear.
- Go to the Insert tab, click Symbol, then choose More Symbols to open the full symbol dialog.
Step 2: Pick a Checkbox Style
Inside the symbol window, you can select from fonts such as Wingdings or Wingdings 2 that include various checkbox shapes. Once selected, the symbol behaves like a character you can copy, paste, and format with your text.
- Set the font dropdown to Wingdings or Wingdings 2 and scroll to find the empty checkbox or tick‑in‑box style you want.
- Click Insert to place the symbol, then close the dialog and reuse the symbol by copying it wherever needed in your list.
Use Checkbox Symbols as Custom Bullets
For longer lists, defining a checkbox as a custom bullet can save time and keep your layout consistent. This technique automatically places a checkbox symbol in front of each selected line.
- Select the lines that should have checkboxes, then click the Bullets dropdown on the Home tab and choose Define New Bullet.
- Click Symbol, pick a checkbox symbol from fonts like Wingdings 2, confirm your choice, and apply it to the list so each item starts with a checkbox.
When to Use Each Checkbox Method
Choosing between interactive checkboxes and symbol‑based checkboxes depends on how your document will be used. Matching the method to user intent ensures your checklist or form works smoothly for everyone.
- Use interactive checkboxes in Word via the Developer tab when you expect users to complete the document on‑screen, such as digital forms, surveys, and internal checklists.
- Use checkbox symbols or checkbox bullets when the document is meant to be printed, shared as a static file, or filled out manually.
Practical Tips for Better Checklists
A few layout and formatting choices can dramatically improve how usable your Word checklists and forms feel. Small tweaks to spacing, alignment, and structure will make your checkboxes easier to scan and click.
- Align checkboxes vertically by using tables or consistent paragraph indents so lists are easy to read.
- Add sufficient spacing between checkboxes and text labels to avoid accidental clicks and improve accessibility, especially in longer forms.
FAQs About Inserting Checkboxes in Word
Why can’t I see the Developer tab in Word?
The Developer tab is hidden by default in most versions of Word, so you must enable it manually in Word Options under Customize Ribbon. Once you tick the Developer checkbox and click OK, the tab appears in the ribbon.
How do I make checkboxes clickable instead of static?
To create clickable, interactive checkboxes in Word, use the Check Box Content Control on the Developer tab instead of inserting a simple symbol. These interactive checkboxes in Word can be checked or unchecked with a single click.
Can I change an X to a checkmark in my interactive checkbox?
Yes, open Content Control Properties for the checkbox from the Developer tab and use the Check Box Properties section to change the checked symbol from an X to a checkmark or another symbol. This lets you match the checkbox style to your document’s design.
Is there a way to quickly apply checkbox symbols to multiple lines?
You can create a checkbox bullet style by defining a new bullet that uses a checkbox symbol from fonts like Wingdings 2 and applying it to your selected list items. This automatically places a checkbox symbol in front of each line.
Do these methods work in both Windows and Mac versions of Word?
Both Windows and Mac versions of Word support interactive checkboxes through the Developer tab and checkbox symbols via the Insert > Symbol feature, though menu names and layouts may vary slightly. The overall steps for enabling the Developer tab and inserting checkboxes remain similar across platforms.
Take Action: Build Your First Interactive Checklist
Now that you know how to insert checkbox in Word using both the Developer tab and the symbol method, you can turn any basic document into a clear, action‑driven checklist or form. Open a new Word file, enable the Developer tab, add checkbox content control for interactive use, and combine it with checkbox symbols for printable versions of the same list to cover every scenario.
Related Topics: How to Clean a Diaphragm Carburetor: Clogged Jets, Cleaning Tips, and Maintenance Checklist
Related Topics: What is the difference between laminate and LVT flooring?


Leave a Reply